
Two rooms can have similar paint colours, flooring and furniture, yet one feels noticeably more polished. Look closely and the difference is often around the edges: neatly fitted skirting, even cupboard doors, smooth walls and lighting that falls where it should.
An expensive-looking renovation usually feels considered. Materials work together, practical equipment has a proper place and nothing appears to have been added as an afterthought.
That is useful news if your budget has limits. You do not need to upgrade every product to achieve a better result. Often, the smarter decision is to simplify the design and protect the time needed to finish it properly.
The renovation finishing details worth prioritising
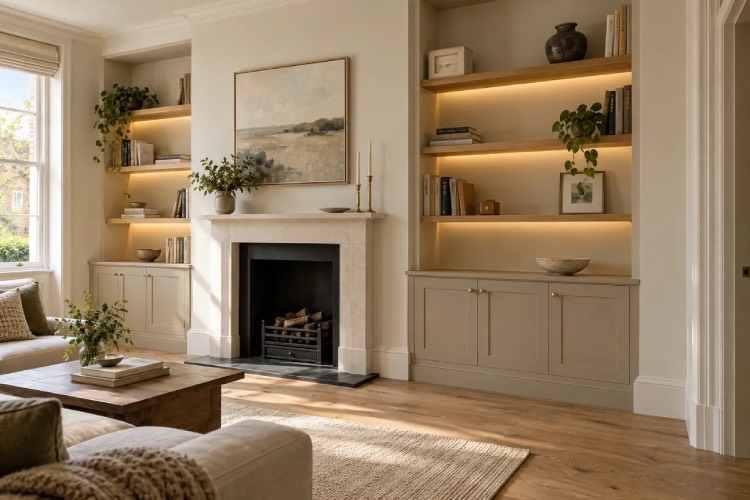
Start with the surfaces and fittings you see or touch every day. Walls, doors, handles and fitted cupboards make a continuous impression, while a statement light or decorative feature only draws attention occasionally.
Before spending more on accessories, look at the basics:
- Are the walls properly prepared?
- Do doors and drawers sit evenly and operate comfortably?
- Are visible joints and material edges neatly finished?
- Have cables, sockets and equipment access been considered?
- Do colours and metal finishes work together?
These details will not all require replacement. Sometimes an adjustment, repair or careful repaint is enough.
1. Smooth walls make the colour look better
Paint is often chosen early and preparation discussed late. That can leave a beautiful colour sitting over old fixing holes, rough repairs and ridges from previous decorating.
Daylight falling across a wall can make those imperfections particularly noticeable. Another coat of paint will not flatten a raised patch or repair damaged plaster.
The preparation should suit the surface. Sound walls may need cleaning, local filling and sanding. More extensive damage may require plaster repairs before decorating can begin. There is no benefit in specifying a full skim automatically if smaller repairs will achieve the agreed finish.
When comparing quotations, ask what “preparation included” actually covers. Walls, ceilings, doors and skirting should be identified separately where relevant, along with any larger repairs.
For example, Nemo Group UK Ltd’s painting and decorating services set out preparation, surface repairs and woodwork detailing as parts of the decorating scope. That level of clarity is useful when judging quotations: compare the work being allowed for, alongside the paint being specified.
Test colours in the room itself, too. A shade that looks warm in a showroom may appear quite different beside your flooring or under your evening lighting.
2. Skirting, architraves and door frames need attention
Freshly painted walls can make tired woodwork stand out more than before.
Thick paint around hinges, chipped door frames and untidy skirting joints can leave a room looking partly renovated, even when its main surfaces are new.
Look at the condition of existing details before deciding to replace them. Sound timber may respond well to careful preparation and repainting. Damaged or poorly fitted sections may justify replacement, particularly where neighbouring profiles no longer match.
Consistency matters, although it does not require identical details throughout the house. Within one room, skirting and architraves should feel appropriate to the doors, ceiling height and character of the property.
For an older home, preserving a suitable original detail can be more convincing than adding an oversized decorative profile simply because it looks impressive in a photograph.
3. Fitted joinery should look as though it belongs
A fitted cupboard can be made from attractive materials and still look awkward if its proportions do not suit the room.
Uneven door gaps, bulky filler pieces and shelves positioned without reference to nearby features can draw attention away from the design. Good fitting makes the relationship between the cabinet and the room feel deliberate.
Before manufacture, consider:
- The width and height of the unit in relation to the wall.
- How it will meet existing skirting, coving and flooring.
- Door swings and drawer access.
- Handle positions and shelf spacing.
- Whether adjoining decoration needs making good.
Older rooms are not always square. A careful installation needs to accommodate the actual walls and floor, rather than assume the drawing will fit without adjustment.
Nemo’s carpentry and joinery service covers fitted storage, alcove units and finishing carpentry, with materials and installation details agreed around the space. For homeowners commissioning similar work, drawings and samples should explain both the appearance and how the unit will function.
Do not assume every component needs to be solid timber. Ask which materials are proposed for the doors, cabinet interiors and visible surfaces, and why they suit the intended finish.
4. Plan lighting around the finished room
A decorative pendant can become the centrepiece of a renovation, but it cannot provide every kind of light a room needs.
Think about where you will read, prepare food, work or relax. Then consider how lighting can support those activities without creating glare or unnecessary visual clutter.
In a living room, a reading light beside a chair may be more useful than adding another ceiling fitting. In fitted shelving, discreet lighting can highlight a few objects without illuminating every compartment.
Position is as important as the fitting itself. Check whether a light source will be visible from the sofa, reflect in the television or shine directly into someone’s eyes.
Agree cable routes, switches and any electrical alterations before final decoration. Cutting into newly finished walls to add a forgotten supply can turn a modest change into avoidable rework.
5. Conceal cables while keeping equipment accessible
A carefully decorated television wall can quickly look unfinished once extension leads, charging cables and loose equipment arrive.
The solution starts with an equipment list. Identify the television, soundbar, router, games console and anything else that needs power or a connection. Plan around the equipment you use, rather than a photograph showing an empty cabinet.
Allow for plugs, connectors and future cable replacement. Follow manufacturers’ ventilation requirements and keep essential access practical.
This is especially relevant to a bespoke media wall or fitted TV unit, where cabinetry, screen position, sockets and optional lighting need to work together. A simple design with accessible equipment can be more successful than a larger feature packed with difficult-to-maintain details.
Before approving the layout, ask how you would unplug a device or replace it. The answer should not involve dismantling the finished joinery.
6. Coordinate hardware without replacing everything
Handles, hinges, taps and light fittings are small individually, but together they influence how coherent a room feels.
You do not need every metal surface to match exactly. However, several slightly different finishes can look accidental when they sit close together.
Put samples beside each other before ordering. Check the finish in daylight and under the room’s lighting, and test how handles feel in use. A handle that looks elegant but is uncomfortable to grip will soon become frustrating.
If the budget is tight, begin with the pieces you touch most often. Adjusting a loose door handle or replacing worn cupboard pulls may be more satisfying than adding another ornament.
Keep anything that already works with the scheme. Coordination does not require a full replacement programme.
7. Decide how materials will meet
Renovations often involve choosing each material separately: flooring first, tiles next, then cabinetry and paint. The awkward decisions appear later, where those materials meet.
A change between floor finishes, the exposed edge of a tiled splashback or the end of a worktop needs an intentional detail.
Ask about these junctions before installation. How will the tile edge be finished? Where will the flooring transition sit? How will a fitted unit meet an uneven wall?
Sealant should also be treated as a visible finishing material. Its suitability, colour and application affect the result. Wide, uneven beads can draw attention to a junction that should sit quietly within the room.
A sample or simple sketch is often enough to resolve the detail before materials are cut.
Where to spend and where to simplify
If the budget is under pressure, removing a feature is often more effective than reducing the quality of every finish.
| Protect in the budget | Consider simplifying |
|---|---|
| Surface preparation and necessary repairs | Decorative treatments on every wall |
| Accurate joinery fitting and door adjustment | Complicated cabinetry shapes |
| Practical lighting and cable planning | Large numbers of display lights |
| Suitable, comfortable hardware | Replacing sound fittings purely to follow a trend |
| Time for finishing and final checks | Extra features added late in the project |
This approach keeps the room convincing as a whole. One well-made focal point usually has more impact when the surrounding finishes are tidy and restrained.
Make the final inspection part of the plan
Finishing quality needs time in the programme, not just a promise that everything will be checked at the end.
Before handover, inspect the space in daylight and with its normal lighting switched on. Look from the doorway, sit where you normally sit and operate the fittings.
Check paint coverage, cabinet doors, drawer movement, handles and visible junctions. Record outstanding items clearly, using photographs where helpful, and agree how they will be addressed.
Be realistic about the existing property and the finish specified. An older wall will not necessarily have the same appearance as a newly constructed surface unless the scope includes the work needed to achieve it.
Before your next renovation, choose the three details you will notice most every day and make them explicit in the brief. Smooth walls, well-fitted cupboards and thoughtfully placed lighting are rarely the loudest parts of a design, but they can make the whole room feel better finished.
related post


Leave a Reply